A Girl & Her Food: clean eating
                   
Showing posts with label clean eating. Show all posts

13.4.15

Watercress Detox Soup #MeatlessMonday #CleanEating #SpringCleanse


Spring is here, so it means I am on a flab to fab journey. To be honest that's the truth, but I was recently diagnosed with rosacea so it's been my #1 priority to cure naturally! 


In order to be healthy on the outside you have to be healthy on the inside.  Don't you agree?  


Over the past several months, I have been under a lot of stress and anxiety with my dog, Syrus, being sick and passing.  I exposed my body to triggers that could have caused this rosacea outbreak. We know that stress and poor diet do your body no good. 

After the Easter and Passover celebrations, I have been focusing on being
super duper fly.... in a healthy way.  
To start my flab to fab journey aka Spring cleaning of my body, I did a Epsom salt and olive oil liver detox. It was tough but yet amazing at the same time! I will share ALL the nitty gritty (no pun intended!) with you tomorrow.
As being A girl & her food, I still have to attend events, dinners and restaurant previews because this is what I do. But, meanwhile when I am at home, cooking, I will be diligent about what goes into my body.  I will be the mean green anti-rosacea machine. 
Speaking of greens, many people don't know that watercress is the BEST detoxifying food.  I will be throwing it into soups, salads, juices and smoothies and so should you! 

Benefits of Watercress:

Currently is in season so you can find it easily at your local market
Flushes toxins out of the body
Filled with vitamins like B, E, C, zinc and potassium-It has more vitamin c than an orange! 
High in fiber so its a natural diuretic 
Great for the skin as it helps prevent wrinkles 
Filled with iron and calcium 
Anti-inflammatory
Cancer fighting agents
Aids in digestion and weight loss 


Watercress Soup

ingredients 
1 tablespoon coconut oil 
3 garlic cloves, smashed
1 small onion, roughly chopped
3 cups of homemade bone broth (or stock) 
1 1/2 cup of water 2 bunches watercress, roughly chopped (reserve some watercress as a garnish)
a handful of organic spinach, roughly chopped
Fresh ground pepper and salt 

preparation
Heat a medium saucepan over medium-high heat. Add the oil.  Toss in the onion and garlic, and cook until sizzling and fragrant, about 1 minute.  Add the bone broth and water and bring to a gentle boil.  Reduce to a simmer for about 1 minute.  Stir in the watercress and spinach. Return to a gentle boil. Reduce to a simmer.  Season to taste with fresh ground pepper and salt. Remove from heat and let it cool slightly before transferring the soup in the blender.  Puree on high for about 1 minute until smooth.  Pour the watercress soup into the bowls, garnish with fresh watercress and serve. Enjoy! 


2.3.15

Coconut Cauliflower Rice Stir Fry


Girl Gone Paleo? Hell nooooooooo! 

If you read this blog regularly, you know I've got all kinds of healthy recipes in my repertoire. As white rice does not agree with my belly, it's one of the top ingredients that I avoid. I have turned to cauliflower 'rice' as my substitute.  If you don't know, white rice is processed, refined and stripped of the outermost and innermost layers of grain, removing most of the fiber, nutrients, and proteins. White rice digests rapidly in your body, creating increased insulin levels, increased fat storage, and will add to your waistline over time.  Furthermore, white rice offers a low level of satiety. 
So you'll eat it, but won't feel very full, and then eat some more with the end result of a guaranteed fat Buddha belly.
It has to be one of the worst feelings EVER for a foodie. So turning to cauliflower "rice" and has been a total game changer for me. Cauliflower 'rice' is cauliflower that has been processed (in a food processor) or grated until it looks like traditional white rice. #Winning!!!  It's a white food you can feel good about eating that can help your waistline shrink for bikini season... which is just around the corner.


Take my advice and try this healthy, low carb, gluten free substitute that will keep your belly feeling warm and full (in a good way!), until that time comes to sport shorts and flips-flops. 


Coconut Cauliflower "Rice"

ingredients 

1 Tablespoon of organic coconut oil 
2 garlic cloves, minced 
1 head of small cauliflower 
1/2 small sweet onion, sliced 
Kosher salt and fresh ground pepper

preparation

Rinse cauliflower and pat dry. Using a cheese grater, grate the cauliflower to a coarse texture (approximately the size of rice grains) 


or use a food processor to pulse the cauliflower to desired rice-like texture. 


Heat the coconut oil in a skillet over medium heat. Sauté the onion and garlic for 3–4 minutes, or until the onion soft and translucent. Add in the cauliflower rice and continue to sauté for 4–5 minutes. Season with salt and pepper, transfer to a bowl, cover and set aside to keep warm. 


Cauliflower "Rice" Stir Fry 

ingredients 

Cauliflower 'Rice' 
1 Tablespoon of coconut oil 
1/2 small sweet onion, slice
2 garlic cloves, minced
1 Tablespoon fresh ginger, peeled and grated 
1/2 head of broccoli, cut into florets
1 carrot, julienned
1/2 red pepper, julienned
3-4 bok choy,  ends trimmed and sliced 
Juice of 1/2 lemon 
1/2 teaspoon of green onion, sliced (optional) 


preparation

Wipe pan clean from making cauliflower 'rice', and heat remaining tablespoon of coconut oil over medium high. add the reaming onion and cook stirring until soft and translucent. Add the garlic and ginger and cook for about 1 minute. Add the broccoli florets, carrot, bell pepper and bok choy, cook and stir until tender for about 5 minutes. Season to taste with salt and fresh ground pepper. Remove from heat and squeeze fresh lemon juice.  
Top cauliflower 'rice' with the stir fry mixture. Sprinkle with green onions or garnish of choice and serve. Enjoy! 


26.2.15

Miso Soba Soup


Hi! Did you miss me? I missed you!

Traveling always takes a toll on my body, especially with the dramatic temperature and climate changes showcased in Miami versus Chicago.  I am feeling under the weather, both figuratively and literally, so I wanted to make a soup filled with warming and healing ingredients.  This Miso-soba soup does the trick!  It takes only minutes, and is made with a Japanese “Mother” broth called, dashi, which is full of unami and health benefits!  


Miso

High in antioxidants, which removes dangerous free radicals from the body

Increases the concentrations of beneficial bacteria, probiotics, in the digestive tract.

Aids in digestion but also plays an important role in maintaining and strengthening the immune system.

The nutrients found in miso include vitamin B2, vitamin E, vitamin K, calcium, iron,and potassium

Miso is also high in amino acids so it provides a large amount of protein.

Reduces risk for breast, prostate, lung and colon cancers 

Strengthens the immune system  and helps to lower LDL cholesterol 

Kombu

Kombu, a sea vegetable, contains anti-inflammatory and antioxidant compounds that are believed to reduce the risk of colon cancer and breast cancer

Sea vegetables have also been shown to lower blood levels of total cholesterol and LDL-cholesterol

Shiitake Mushrooms

Refereed to as the medicinal mushrooms (maitake and reishi too)

Immune-boosting properties

Reduces blood cholesterol levels

Helps fight cancer

Contains a potent antioxidant called L-ergothioneine and is not destroyed when cooked

Ginger

Alleviates symptoms of gastrointestinal diseases

Anti-inflammatory benefits

Helps diminish nausea

Promotes healthy sweating to assist detoxification

Helps alleviate arthritis pain

Scallions

Low-calorie vegetable

Source of vitamin K, which ways an important role in normal blood clotting


Miso Soba Soup 

ingredients

For the dashi:

1 strip of Eden Foods Kombu
4 cups water
optional: 1/4 cup of bonito flakes 

Note: swear by Eden Foods soba noodles and kombu 

 For the miso soup:

Dashi Broth (see below)
3 Tablespoons shiro miso
½ cup shiitake mushrooms, sliced
1 teaspoon fresh ginger, grated
¼ cup scallions, chopped
4 pieces of bok choy, trimmed and thinly sliced
8oz Eden 100% buckwheat soba noodles, cooked

preparation

to make soba noodles:

Add the noodles to boiling water for 8 minutes or until tender. Rinse the cooked noodles with cold water. Make sure don't overcook! 

to make the dashi:

Gently rinse or wipe off the dust on the  kombu piece. Place the strip in a medium pot with 4 cups water. Bring to a simmer for 10 minutes. Make sure not to let it boil as it can make the kombu flavor will turn bitter. Once the kombu strip is soft, remove it and bring the dashi to a boil. Let it boil for a 2-3 minutes. 

To make the miso-soba soup:

Reduce heat and add an additional cup of water. In a small bowl, laddle one spoonful of the dashi broth and stir in the miso, mixing until a paste is created and there are no clumps present.  Stir the paste into the pot with remaining dashi. 

Add the grated ginger, bok choy and shiitakes, and simmer on low for about 10 minutes.  (Note: If your broth is getting too thick add more water to maintain a thin consistency).

to serve:

Place the soba noodles in a bowl and pour the miso broth with vegetables onto the noodles and garnish with scallions. Serve hot! Enjoy! 


13.2.15

Roasted Radishes with Their Greens, A Perfect Valentine's Day Bite!


What something sweet, tender yet caramelized with a sexy crunch for a side dish for Valentine's Day dinner? I suggest you change things up by simply roasting radishes with their greens.  The roasted and wilted greens taste similar to kale chips yet the radishes retain their beautiful color but mellow their peppery taste.  Use the roasted radishes with their greens as a side dish to your meat dish like lamb, chicken or pork or toss 'em in a salad.


Roasted Radishes & Their Greens

ingredients

1 bunch of radishes and their greens, washed thoroughly

1/2 Tablespoon olive oil 

Kosher Salt and fresh ground pepper

preparation

Heat oven to 350 degrees. Make sure to wash thoroughly and towel dry the radishes and their greens. If you purchases large radishes, I recommend halving them. 

Separate half the radishes from their greens, toss with olive oil and season with salt and pepper. Arrange in a single layer on a rimmed baking sheet. I used my SILPAT.   Roast, for about 20 minutes or  until the radishes are tender and caramelized and their greens are crisp.  Let cool and enjoy!
 PS. Feel free squeeze fresh lemon juice. 


15.12.14

Hummus Baked Chicken

For years I swear by the 21-day cleanse by Clean Program, it changed my life. Here is a recipe adapted from the Clean Program that you will love, make this ASAP and do your body some good! 

With the Holidays approaching and it being the most stressful time of the year this recipe is healthy, simple and stress-free. It takes a minute to prep....and all you have to do is place it in the oven, set the timer, and go back to wrapping gifts, addressing Holiday cards, etc. 


ingredients

2 boneless chicken breasts 
2 lemons, 1 sliced in rounds and the other juiced
1/2 cup of hummus (ideally homemade)
4 fresh sprigs of thyme
Kosher Salt and fresh ground pepper to taste 

preparation

Preheat oven to 450 degrees 

Place chicken in a baking pan or sheet. Cover the top of the chicken with a thick layer of hummus, about 1/4".  Arrange lemon slices and rosemary sprigs on top of the hummus covered chicken. Drizzle the chicken lemon juice. Make sure to set aside some lemon juice before serving.  Bake the chicken for about 30 minutes or until hummus is golden brown and chicken is cooked all the way through. Drizzle with lemon juice and season with salt & pepper. Serve immediately. 


27.11.14

Baked Sweet Potato With Greens

With my upcoming trip to South Beach for the #SOBEWFF, in a couple weeks, I want to be bikini ready.  Therefore, I have been really focusing on eating clean. I usually don't like to shop at Costco, and honestly try to avoid it at all costs.  But with the abundance of snowfall, I needed to stock up on some pet safe salt, and Costco has the best price for it. If I am there, I ALWAYS check out the book section as I often find my favorite cookbooks by Phaidon. Unfortunately, I was out of luck this time but I did come across a very intriguing book called Clean Slate. I LIVE to eat clean, and love reading and educating myself about resetting my health, detoxing my body, and restoring my energy.  The recipes in Clean Slate are perfect as they are proportioned for 2 people (m and my husband), and it even offers a simple menu for a 3-day or 21-day cleanse with easy to follow tips. 


Sweet potato with greens recipe is low in calories and high in fiber. I always have sweet potatoes in my pantry, they are antioxidant powerhouses. They are packed with beta-carotene and filled with anti-inflammatory nutrients.  


Sweet Potato with Greens 


      adapted from Clean Slate 


ingredients

2 organic sweet potatoes, scrubbed and pricked all over with a fork
1 Tablespoon of coconut oil
1 small shallot, thinly sliced
1 bunch of collard greens, touch stem trimmed and leaves chopped
1 avocado, halved, pitted, peeled and sliced
Cayenne pepper
Coarse Sea Salt
Lemon Wedges, for serving

preparation

Preheat oven to 400 degrees. Bake sweet potatoes on a baking sheet until tender, about 40 minutes.
Meanwhile, heat oil in a large skillet over medium, add the shallots and cook until tender, stirring often, for about 6 minutes. Add the green and cook stirring until wilted, about 5 minutes. Season with salt.
split the potatoes and top each with greens and sliced avocado. Season with cayenne and salt. Squeeze with lemon before serving.

Note: I substituted olive oil with coconut oil, shallot for onion, swiss chard fro collard greens.


14.11.14

Whole-Grain Mustard Baked Chicken {Clean Eats}


If you follow me on social media, you know that I have been traveling, and therefore eating out almost every night.  While I do enjoy this part of my life very much, all I wanted to do was make a healthy and wholesome dinner once I got back home.  I turned to a chicken recipe from one of my favorite sources of clean eating, Clean Eats by Alejandro Junger M.D. founder of the Clean Program

It is important to know that the food you are putting in your body comes for good reliable sources that don't cut corners and process your foods.  This is especially true when discussing poultry and meat. Therefore, if I am cooking with proteins I always try to go to my local butcher, because I know they are sourcing amazing products that not only taste great, but are ultimately healthier for my body as they do not contain any preservatives, hormones, or antibiotics.

If you can think a few days out and plan to cook more than once, buy the whole chicken and have the butcher break it down for you.  I had the guys at Butcher and Larder break down one fresh chicken from Gunthorp Farms into wings, breasts , thighs and drumsticks.  From that, I was able to make this dish and two other dishes that I had 2 nights later, which included grilled buffalo chicken wings and chicken paillard from the breast.  It is always great to be able to cook with all parts of the animal and not waste anything. You can even use the bones from the chicken to improve the flavor of a soup stock!


Recipe adapted from Clean Eats 

ingredients 

2 pasture raised chicken legs, thighs and drumsticks 
1/4 cup extra virgin olive oil 
2 Tablespoons whole-seed mustard 
(like American Spoon  available at Publican Quality Meats or LocalFolksFoods at many locations like Whole Foods, Plum Market, Sunset Foods, etc
3-4 garlic cloves
1 teaspoon fennel seeds
1 teaspoon apple cider vinegar like Braggs
2 teaspoons sea salt

preparation

Preheat oven to 400 degrees. 

In a large bowl, toss all the ingredients together and allow the chicken to marinate for 15 minutes at room temperature. Transfer the marinated chicken into a baking dish and make sure to pour the leftover marinade over the top chicken by using a wooden spoon. 

Bake the chicken for 20-30 minutes, or until it is nicely browned. I set the oven to broil for 2 or so minutes to create that nice brown crust on top of the meat. Serve and enjoy! 

I spread mashed celery root with horseradish and scallions the bottom and placed two pieces of chicken on top. 


7.11.14

Eggs in Purgatory. Uova in Purgatorio. Shakshuka.

Eggs in purgatory...
                 Uova in Purgatorio...
                                   Shakshuka....


Whatever you call this dish, it's easy to make, fool-proof and it tastes so good. 
It's my go-to as it is ready under 10 mins and a one-pot wonder.

Are you a health nut?
Watching your waistline?
In desperate need for the ultimate hangover cure?
Gluten-free?
Paleo?
Vegetarian?
Budget-conscious?
 I don't-know-how-to-cook type? 
or no-time-to-cook type? 

I got you covered! 


This recipe is probably the most friendly and forgiving recipe, to even the most brutal of home cooks, of any recipe that I have ever posted. I prefer to make it for a weekday breakfast or weekend brunch.  But it works as a lunch or a weeknight dinner too!  


Serves 2

ingredients 

1 Tablespoon olive oil 
1-2 garlic cloves, minced
1/4 teaspoon red pepper flakes 
2 cups of homemade marinara or 1 14oz can of organic diced tomatoes 
2 organic, cage-free or fresh farm eggs ( I only use fresh farm eggs) 
2 Tablespoons of freshly grated parmesan cheese
1/2 teaspoon freshly chopped basil 
Kosher Salt and Freshly ground pepper to taste
2 sliced of country bread (or bread of your choice)

preparation

Pour the olive oil into a cast iron skillet, add garlic and red pepper flakes, over medium high heat, cook, sitting often,  for about 1 minute. Pour in the tomatoes or marinara, season with salt and fresh ground pepper, bring it to a bubble so the liquid is hot enough to poach the eggs. 
Crack the eggs, sprinkle the grated parmesan cheese, and cover partially with a lid. Let it bubble for about 5 minutes. Be sure to keep an eye on it as you want the egg white set but the yolk still runny. 
Remove from heat. Place skillet on a trivet with a hand towel. Top with fresh herbs with basil, parsley or cilantro. You can also add  more parmesan cheese and salt and pepper according to your taste preference. Use bread of your choice to dunk into the goodness.  Enjoy! 


15.10.14

Zucchini Noodles aka Zoodles with Slow-Roasted Tomato Marinara


Recent weather here in Chicago has been dreary, so I grabbed the last of my fresh garden tomatoes and basil, and created this colorful and healthy lunch in hopes to fuel up "my happy tank".  Three days filled with cold and non-stop rain brings everyone down.  Argh! What happened to an Indian Summer?

My slow roasted tomatoes will make your kitchen smell like Nonna's house as they roast for several hours. If that smell can't make you feel all warm and happy inside on a dreary day,  I am not sure what will. Food is comfort. 

The zucchini noodles recipe I am sharing with you today is: 
  • paleo
  • gluten-free
  • meatless monday
  • clean eating
  • vegetarian
  • low-calorie 
  • dairy-free 
  • it's just so good for you! 
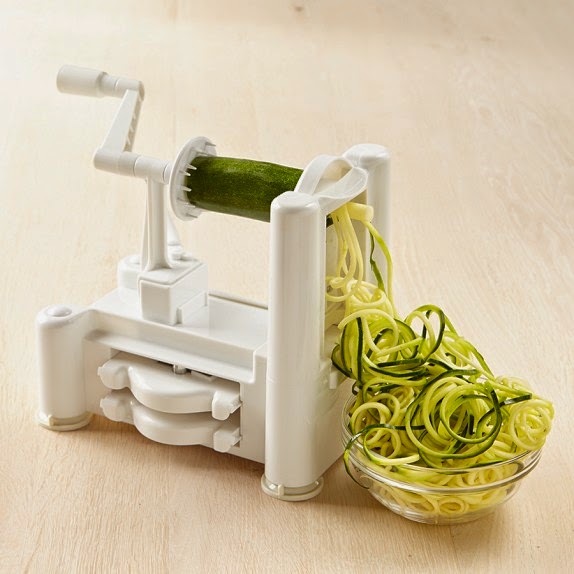
I swear by my Paderno Tri-Blade Spiral Vegetable Slicer. Available at Williams-Sonoma. It is a game-changer when preparing apples, potatoes, carrots, cucumbers, and zucchini! 

Williams-Sonoma

Zucchini Spaghetti (Zoodles) 
serves 2


ingredients

2-3  Zucchini, medium-sized

preparation 

Note: 
Zucchini is rather moist, however, so you should rinse them even if you plan to consume the noodles raw. If boiling or sautéing zucchini noodles, you should place the noodles inside a colander tossed with a teaspoon and let the noodles drip dry for 20-30 minutes. When done, rinse the noodles and wrap the noodles in paper towels and squeeze gently to absorb as much excess moisture as possible.

raw:

Slice off the ends of each zucchini, set in Paderno vegetable slicer to create noodles. Top with slow-roasted tomatoes or slow-roasted tomato marinara and fresh basil leaves. Season to taste with fresh ground pepper. 

hot:

Slice off the ends of each zucchini, set in Paderno vegetable slicer to create noodles. Once the noodles are created, place the noodles inside a colander tossed with a teaspoon of slat and let the noodles drip dry for about 20-30 minutes. When done, rinse the noodles and wrap the noodles in paper towels and squeeze gently to absorb as much excess moisture as possible. 

In this recipe, I sautéed the noodles with some olive oil and minced garlic of one clove. Heat your skillet or sauté pan over medium-high heat with about a tablespoon of olive oil.  Sauté the noodles and garlic for about 6-7 minutes, stirring frequently. Top with slow-roasted tomatoes or slow-roasted tomato marinara and fresh basil leaves. Season to taste with fresh ground pepper. Enjoy!