A Girl & Her Food: meat free monday
                   
Showing posts with label meat free monday. Show all posts

15.10.14

Zucchini Noodles aka Zoodles with Slow-Roasted Tomato Marinara


Recent weather here in Chicago has been dreary, so I grabbed the last of my fresh garden tomatoes and basil, and created this colorful and healthy lunch in hopes to fuel up "my happy tank".  Three days filled with cold and non-stop rain brings everyone down.  Argh! What happened to an Indian Summer?

My slow roasted tomatoes will make your kitchen smell like Nonna's house as they roast for several hours. If that smell can't make you feel all warm and happy inside on a dreary day,  I am not sure what will. Food is comfort. 

The zucchini noodles recipe I am sharing with you today is: 
  • paleo
  • gluten-free
  • meatless monday
  • clean eating
  • vegetarian
  • low-calorie 
  • dairy-free 
  • it's just so good for you! 
I swear by my Paderno Tri-Blade Spiral Vegetable Slicer. Available at Williams-Sonoma. It is a game-changer when preparing apples, potatoes, carrots, cucumbers, and zucchini! 
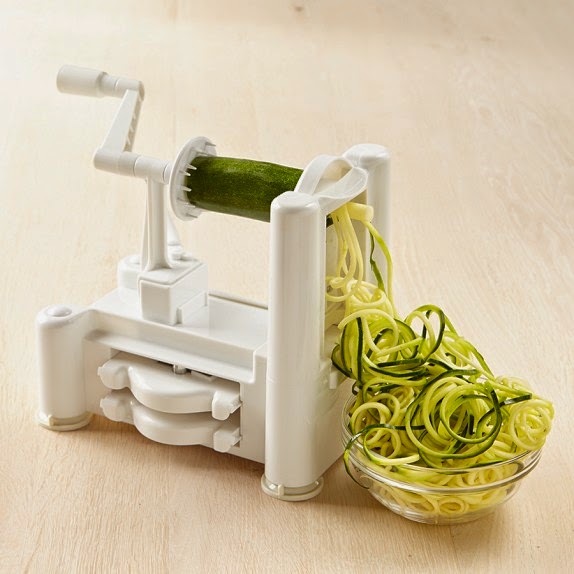
Williams-Sonoma

Zucchini Spaghetti (Zoodles) 
serves 2


ingredients

2-3  Zucchini, medium-sized

preparation 

Note: 
Zucchini is rather moist, however, so you should rinse them even if you plan to consume the noodles raw. If boiling or sautéing zucchini noodles, you should place the noodles inside a colander tossed with a teaspoon and let the noodles drip dry for 20-30 minutes. When done, rinse the noodles and wrap the noodles in paper towels and squeeze gently to absorb as much excess moisture as possible.

raw:

Slice off the ends of each zucchini, set in Paderno vegetable slicer to create noodles. Top with slow-roasted tomatoes or slow-roasted tomato marinara and fresh basil leaves. Season to taste with fresh ground pepper. 

hot:

Slice off the ends of each zucchini, set in Paderno vegetable slicer to create noodles. Once the noodles are created, place the noodles inside a colander tossed with a teaspoon of slat and let the noodles drip dry for about 20-30 minutes. When done, rinse the noodles and wrap the noodles in paper towels and squeeze gently to absorb as much excess moisture as possible. 

In this recipe, I sautéed the noodles with some olive oil and minced garlic of one clove. Heat your skillet or sauté pan over medium-high heat with about a tablespoon of olive oil.  Sauté the noodles and garlic for about 6-7 minutes, stirring frequently. Top with slow-roasted tomatoes or slow-roasted tomato marinara and fresh basil leaves. Season to taste with fresh ground pepper. Enjoy! 


22.9.14

Meatless Monday {Clean Eating} Roasted Beet Carpaccio


As a Polish girl, I was born with a beet in my hand.  We go together like peanut butter and jelly.  Every week, I am sure to buy them at the farmers' market and incorporate them into my (Polish) diet.   Eating whole and clean is very important to me, and it is not as difficult as people make it out to be.  The following recipe is from the book Clean Eats, by Dr. Alejandro Junger, the person I consider to be my clean eating guru.

A few months back, my husband and I hosted a small dinner party.  I was looking to make something, like a gorgeous starter or passed appetizer that would impress my guests.  When I saw the roasted beet carpaccio pictured in his book, I instantly knew this dish would be the one to get everyone at the party talking.  It did not disappoint.  The presentation was colorful and elegant, and most importantly it was delicious.  As most people usually eat a meat or fish carpaccio, a vegetarian option makes for an attractive option.


adapted from Clean Eats  


ingredients

4 large beets, peeled (use rubber gloves when peeling beets!)
2 handfuls of frisée, spinach or arugula
1 small handful of fresh herbs, such as mint, dill, parsley, ideally some edible flowers
Juice of one lemon
1/4 cup extra virgin olive oil, plus more for beets
Sea Salt and freshly ground black pepper to taste 

preparation

Preheat the oven to 350 degrees. Place beets in a baking dish, pour about 1/2 inch of water and then cover the dish with tinfoil. Roast the beets for about 45 minutes or until the beets are fork tender. remove them from the oven, drain the water, and allow the beets to cool. 
Once the beets have cooled, use a mandoline to slice them unto very thin rounds. Be careful as I sliced my finger on my mandoline, if you don't have one use a sharp knife to slice the rounds. 
Arrange the thinly sliced beets  over two serving plates, covering the entire surface of each plate. Drizzle the beets with olive oil and sprinkle them with the  sea salt. In a medium mixing bowl, toss the greens and herbs with the lemon juice, olive oil and salt and fresh ground black pepper.  grab a small bundle of greens with your hand and place it in the center of each plate, on top of the beets. Serve immediately and enjoy! 


30.9.13

Shaved Brussels Sprouts Cesar Salad

Coupled with the fact that today is Meat Free Mondays, sharing today's recipe was easy, as Brussels Sprouts are also in season.  I hand picked these cruciferous gems at Green City Market, my local Farmers' Market, to make as the centerpiece of this shaved Brussels sprout salad.  This wonderful dish is not only easy to prepare, but its also delicious and healthy.  I prefer to eat this raw and cold, but feel free to sauté them in a bit of olive olive and garlic and toss in the remaining ingredients.  The key to this dish is shaving the Brussels sprouts as thin as possible to avoid any bitter taste. The shreds of red onion and the grated Pecorino cheese take my taste buds to veggie heaven! 


ingredients


6 medium sized Brussels sprouts, thinly sliced 
1/4 red onion, thinly sliced 
1/4 Pecorino cheese, grated 
1 1/2 Tablespoons of Trader Joe's Romano Cesar Dressing 
Fresh ground pepper 

preparation

Wash and trim the ends of the Brussels sprouts. Remove and discard any damaged leaves.  Using a mandoline or a sharp chefs knife, thinly slice the sprouts. Next, peel the red onion and thinly slice it. Place the shaved sprouts and red onion in a large bowl.  Toss in the dressing and set aside for about 
10-15 minutes.  Divide the salad onto a plate and grate the fresh Pecorino. Season with some fresh ground pepper and serve.  Enjoy! 


12.6.13

Farmer's Market Taco: { Grilled Asparagus, Brunkow Cheese, Pickled Red Onion Tacos with Ancho Chile Sauce }

Asparagus is in-season, and I purchased mine from Mick Klug Farms at Green City Market. In addition to asparagus, one of my favorite finds at that market is the Brun-uusto Baked Cheese from Brunkow's. You can throw this cheese on the grill and the magic happens. I thought what a great idea to combine the two into a farmer's market taco creation. The inspiration came from from Chef David Dworshak at Takito Kitchen in Wicker Park. They also use the Brunkow Cheese in a home made taco along with veggies.  Those are REALLY great, but I was hoping to create my version using only seasonal and local ingredients straight from the the farmer's market to my table.  It turned out great... enjoy!


I paired this dinner with a bottle of Lagoon Hill,  Sauvignon Blanc, a personalized wine delivered to my doorstep from Tasting Room by Lot 18. I recommend you try the wine tasting kit; it's only $9.99. 
It's simple and fun!  I tasted... I rated.... and Tasting Room's WinePrint technology personalized the wines that suit my palate! I am so relieved to be part of this program because now I don't have to settle or attempt to choose wines at the store, all the bottles that are delivered to me are just right! 


Ancho Chile Sauce


ingredients


2 ancho chile pods, seeded and stemmed

1 chipotle chile or 1 tablespoon sauce from 1 can chipotles en adobo
1 small yellow onion, finely sliced
2 garlic cloves, grated 
1 tablespoon olive oil 
1 tablespoon apple cider vinegar 
2 teaspoons dried oregano, preferably Mexican 
2 teaspoons of fresh lime juice from about 2 limes 
1 cup, water 
2/3 cup Mexican crema or sour cream 
Fresh ground pepper and kosher salt to season 


preparation 


Heat the ancho chiles in a sauté pan over medium high heat, turning occasionally for about 3 minutes or until toasted. Place the ancho chile in a bowl with the hot water. I use my electric water kettle to achieve the perfect water temperature. You can also heat the water in a microwave safe bowl for 1 minute.  Let it steep until the ancho chiles are softened. 


Using the same saute pan, heat 1 tablespoon of olive oil over medium high heat adding the onions; cook for about 6 minutes or until translucent, soft and lightly browned. Add the garlic and oregano, cook for about 30 seconds and the vinegar, chitople chile and cook for about one minute. Transfer this mixture into a blender along with the ancho chiles, crema (sour cream), and lime juice. Pulse  until smooth and blended. Season to preference with fresh ground pepper and kosher salt. If you can't buy ancho chile, just omit that preparation and make chipotle sauce! 

Grilled Asparagus Taco 


ingredients 


2 - 2 1/2 lbs of asparagus, bottoms trimmed 

1/2 teaspoon olive oil 
Fresh ground pepper and Kosher salt 
1 block of Brunkow's Brun-uusto Original Baked Cheese
1 package of corn tortillas
 (I used freshly delivered Atotonilctortillas)
Pickled red onions 
Fresh Cilantro leaves 
Lime wedges 

preparation 

Toss and coat the asparagus in olive oil and season with Kosher salt and fresh ground pepper.  Make sure your grill is cleaned and gently wiped down with olive oil. Heat your grill or  indoor grill pan to medium heat. Grill the asparagus for 7-10 minutes, until charred and fork tender. Turn the asparagus every few minutes so they cook and brown evenly. Remove from heat. Cut into 1-inch segments. While the asparagus is on the grill, throw your block of Brun-uusto on  the grill too and cook to your melted preference. 


To plate tacos, double stack your warmed tortillas. Spread the ancho chile sauce on tortilla, divide asparagus and cheese between the tortillas. Top with pickled red onions and cilantro. Serve immediately and garnish with lime wedges.  Enjoy! 


8.4.13

Black Bean and Goat Cheese Quesadillas

Happy Meat Free Monday! The NCAA championship is on tonight and I want to watch the games at home. I going to prepare an inherently quick and easy dinner with uses black beans and goat cheese, two ingredients I have on hand. What a perfect marriage of flavors on a crisp quesadilla!


Yields one serving

ingredients
2 flour tortillas
1/3 cup black beans, drained, rinsed and cooked
1/4 cup of goat cheese
Guacamole for serving (optional)

preparation
In a saute pan, over medium-low heat, place a tortilla in the pan.  Spread the black beans evenly over the tortilla and sprinkle on the goat cheese.
Raise the heat to medium high and cook until the cheese begins to melt and the tortilla begins to brown. Place the remaining tortilla on top of the cheese and black bean mixture and press down lightly to form  a quesadilla. Using a spatula, flip the quesadilla over in the pan and heat for about 1 minute or until cheese is melted and tortilla is browned.  Remove from heat and place the quesadilla on a plate. Cut into quarters, (shown above) and serve with guacamole or salsa. Enjoy!


2.4.13

Stephanie Izard's Roasted Cauliflower

 Stephanie Izard shared this recipe with her guests at the Macy's Culinary Council cooking demo last week.  It is actually an amazing dish featured on the menu at her vastly popular restaurant Girl and The Goat.  The recipe consists mainly of roasted cauliflower, mint, pine nuts and pickled peppers.  The pickled peppers are so good that after the demonstration I ran over to Little Goat and bought them (they come in a mason jar and cost only $5).  Later this week, I plan to get the ingredients and pickle the peppers myself. This is a delicious and filling meal that is perfect for Meat Free Monday. I would recommend it as a main if you are a vegetarian or gluten-free, or as a great side dish for you carnivores. Enjoy! 


and my retake in my kitchen.....


 Stephanie Izard's Roasted Cauliflower 

ingredients 

2 Tablespoons Canola Oil (I used Grape seed Oil) 
1 head cauliflower, quartered, outer leaves and core removed and cut into 1/4 inch slices
2 teaspoons salt
3 Tablespoons Crunch Butter (see Recipe), At room temperature
1/4 cup mint, torn into pieces, plus 1 tablespoon set aside
1/4 cup pin nuts, toasted, plus 1 tablespoon set aside 
1/2 cup Parmesan,grated plus 1 tablespoon set aside 
1/3 pickled peppers (see recipe) 

preparation 

Heat oil in a large skillet. Add cauliflower and cook over high heat until caramelized and soft, 6 minutes. 
Season with salt and cook an additional 2-3 minutes. Add crunch butter. When melted toss in the mint, pine nuts, and Parmesan. Cook an additional 2 minutes. Plate in a bowl and sprinkle with additional mint, pine nuts, and Parmesan. 
Yields 4 servings

Crunch Butter 

ingredients 

5 ounces butter, room temperature
2 garlic cloves, minced
2 Tablespoons Parmesan cheese, grated
6 Tablespoons Panko bread crumbs

preparation 

In a bowl, mash the butter until softened with a fork (or potato masher). Add the remaining ingredients and mix until fully incorporated. 

Yield 1 1/2 cups

Pickled Peppers 


ingredients 

2 cups champagne vinegar 
4 Tablespoons salt 
3/4 cup sugar
3 banana peppers, seeds removed, sliced into thin rings on a mandolin
3 Hungarian peppers, seeds removed, sliced into thin rings on a mandolin 

preparation 

In a pot, bring vinegar, salt and sugar to a boil. While still hot, pour the pickling liquid over the peppers. Let cool to room temperature, keeping the peppers submerged in the liquid. When cool, cover and refrigerate. 

Chef note: in the restaurant we use a Crumber to remove all of the seeds from the peppers to ensure that we keep them whole and not pierce the flesh. You can use a long spoon or a paring knife. Yields 1 quart. 

Recipes compliments of Stephanie Izard 
Macys.com/culinarycouncil


7.2.13

Bobby's Dinner Battle on Food Network: Marinated Mozzarella Bites

On Food Network's Bobby's Dinner Battle, Bobby Flay gifted Steve and I a jar of Spanish olives with pimentos.  I usually make this appetizer with a slow-roasted tomato but for the dinner battle challenge I substituted the slow-roasted tomatoes with Bobby's gift: Olives.  Guests at my dinner parties always gobble these down however my competitor stated due to the rosemary sprig, my appetizer was difficult and awkward to eat.  On the show, I originally planned to make roasted beet bites or a roasted beet and goat cheese tower/salad for Marc, but he said he didn't like beets! I was so bummed because the colors, taste, and presentation would of made it a winning vegetarian appetizer!  I am an avid
Meat Free Monday cook and have many vegetarian friends, hearing him say that he doesn't like beets was a complete shock me! Beets are so good for you!

What do you think? What would you have made as a vegetarian appetizer???


Slow Roasted Tomatoes 

Ingredients 
Grape Tomatoes
Olive oil 
Salt 

Preparation
Preheat oven to 275 degrees. Cut the tomatoes in half horizontally and rub a little bit of olive oil on them.  Place the tomatoes seed side up on a baking sheet. Sprinkle the tomatoes with a pinch of salt . Roast for about 2-3 hours (you can also use vine-ripe tomatoes and roast 3-5 hours) You want to make sure they are caramelized and the moisture is evaporated. You can store the tomatoes in refrigerator up to one week in an air-tight jar but drizzle them with olive oil.

Marinated Mozzarella 

Ingredients 
1 block of mozzarella cheese
12-14 slow-roasted or sun-dried tomatoes
1/8 cup of olive oil 
1 tablespoon of finely chopped flat leaf parsley
1/2 teaspoon of dried oregano
1/2 teaspoon of Greek seasoning 
Kosher salt
Fresh ground pepper 
Garnish: fresh sprigs of rosemary 
Preparation 
Cut the block of mozzarella cheese into 1-inch cubes.  In a bowl whisk together the olive oil, parsley, oregano, Greek seasoning. Season to taste with salt and fresh ground pepper. Stir or toss in the cubes of mozzarella cheese. Cover or let chill for up to 24 hours before serving.  Transfer the cubes onto a serving plate, place the slow-roasted tomato or olive on top of the cheese cube and garnish with a short rosemary sprig. Serve and enjoy! 


14.11.12

Roasted Brussels Sprouts & Red Onions with Balsamic Vinegar

Thanksgiving is around the corner and I wanted to share some skinny in-season side dishes. I swoon over brussels sprouts and they supply you with vitamin C.  This side dish can be prepared a day prior by trimming and quartering the brussels sprouts and slicing the onions up. It's guilt free because it's a low-cal & low-fat side dish! 


serves 8

ingredients


1 1/1 lb brussels sprouts, trimmed and quartered

1 1/2 lb red onions, thickly sliced
1/4 cup balsamic vinegar
1 tablespoon olive olive 
kosher salt
fresh ground pepper 

preparation


preheat oven to 450 degrees. Line a large baking sheet with parchment paper or nonstick foil. 
Spread the brussels sprouts in single layer on prepared baking dish and toss with olive oil. Roast the brussels sprouts, stirring occasionally, for about 12 minutes. 
Add the onions, tossing to combine and roast for about 10 minutes or until golden brown. Drizzle the balsamic vinegar, tossing to combine and roast for about 2-3 minutes longer. 
Transfer to serving bowl and season to taste with salt and fresh ground pepper. 

Enjoy! 


Pochettes of Feta, Tomato & Basil


"Cook with your heart, because cooking is celebration and food is love" 
          - Padma Lakshimi


I know this recipe seems a bit labor-intensive, but it is well worth it when you want to impress your dinner guests with something spectacular. It is a definite crowd pleaser. The thing to remember is not to let working with the filo pastry intimidate you. Just stay calm and give your self lots of time for the project. I assemble the pochettes a couple of hours ahead and pop them in the oven just 10 minutes before guests arrive, keeping them warm in the turned-off oven if necessary.


ingredients

1 1-pound package filo dough (about 30 sheets measuring 17 inches by 12 inches)
5 plum tomatos
10 ounces Greek feta cheese, crumbled
2 cups loosely packed, finely chopped fresh basil
1/2 teaspoon crushed dried red pepper
Salt (optional)
1 cup (2 sticks) butter, clarified ( I used ghee)


preparation

Remove the filo from the refrigerator 30 minutes before starting. 
Slice the tomatoes lengthwise and scoop out the seeds with a spoon. Squeeze gently to eliminate excess liquid. It’s important to get the tomatoes as dry as possible. Wipe dry, inside and out, with a paper towel. When the tomatoes are dry, dice them.
 In a bowl, combine the tomatoes, feta, basil, and crushed red pepper to form a salad. Add a pinch of salt only if needed.
Prepare the filo dough by laying out a clean dishcloth on a flat surface. Make sure both surface and cloth are large enough to accommodate the flat filo. Stack the filo on the cloth, and cover with another dishcloth. With hot water, dampen and wring out a third cloth and lay that flat over the top cloth.
Preheat the oven to 375°F.
Cut the filo stack carefully—with kitchen scissors, as knives tend to tear the pastry—into 8-inch squares. Remove 3 squares of the filo at a time, keeping the rest under the towels.
Take 1 sheet and brush it with the clarified butter. Place a second sheet of the filo at a 45° angle over the first, and brush this with butter as well. Place the third sheet of filo at a 45° angle over the second, and brush this with the clarified butter.
Now spoon 1 to 2 tablespoons of the tomato salad onto the center of the filo. Gather together the corners of the filo and twist the packet ends gently, as you would the ends of a hard-candy wrapper. Fan out the ends into a rose floret. Then peel down the petals to fan out a nice crown. Brush the top of the pochette with more clarified butter. Repeat this process until you have about 10.
Place the pochettes on a baking sheet in the preheated oven for 10 to 12 minutes, until the sides are golden brown. Serve warm.

© 2007 Padma Lakshmi Tangy, Tart Hot & Sweet 

30.10.12

Spicy roasted pumpkin seeds

I love Pumpkinpalooza! After carving your pumpkins for Halloween or cooking with pumpkin, don't throw out the seeds. I promise you, they are the best and a very healthy snack built into your pumpkin. Toast the seeds in the oven for a perfect fall treat! There are so many ways to flavor the seeds, my favorite is make 'em spicy! If you have a sweet tooth, use cinnamon and sugar as your seasoning. Yum-O! 


ingredients

1 1/2 cup of pumpkin seeds 
(rinsed and cleaned from pumpkin membranes/pulp)
2 tablespoons olive oil 
1/2 teaspoon paprika
1/4 teaspoon cayenne pepper


preparation 

Preheat the oven to 350 degrees. Clean and rinse the seeds from pumpkin membrane and pulp. I am obsessed with my Dexas collapsible strainer, it saves so much room in the cabinet and drawer. It is super easy to clean and dishwasher safe.  


In a bowl, toss the seeds with olive oil and seasoning. Make sure to coat thoroughly and evenly. Spread the seeds on one even layer on a baking sheet. You can use a spit mat, parchment paper, or aluminum foil on a cookie sheet. Bake for about 30 minutes or until seeds are toasted golden. Enjoy! 


28.10.12

Oven-Baked Rutabaga Fries

Today was the last day of the Wicker Park Farmers Market. I am officially depressed that all the outdoor markets are over. But, I do look forward to the Logan Square indoor market starting November 4th! For the last day of the market, the root vegetables looked great, so I bought some rutabagas. Rutabagas are my favorite root vegetable, I usually mash them but I decided to make delicious fries. They have less than a third of carbs and less than half the calories of potatoes. Rutabaga fries are with vitamins and minerals and the seasoning makes them so much better! I love it when I make things that not only taste good but are actually good for you! 


ingredients


1 rutabaga, washed and peeled

Olive Oil
Paprika (season to taste preference) 
Cayenne Pepper (season to taste preference) 


preparation


Preheat oven to 425 degrees. Cover a baking sheet with a split mat, parchment paper or foil. Using a sharp knife, cut the rutabaga into equally sized fry pieces. Layer the cut rutabaga on the lined baking sheet, drizzle with olive oil and seasonings. Mix well. Bake for about 30 minutes, making sure to toss after 12 minutes, so that they bake evenly. Once baked, remove from oven, and serve with some ketchup. 


6.8.12

Squash Blossoms Stuffed with Goat Cheese


Happy Meat Free Monday!  Every summer, I obsess about squash blossoms. I bought the squash blossoms from Nichols Farm at the Wicker Park Farmers Market.

These blossoms are so delicate, yet delicious and savory in so many forms. I decided to stuff them with goat cheese and pan-fry them in a light batter to a golden crisp perfection. It's time consuming to prepare and stuff the blossoms because you MUST handle the flower carefully. You have to remove the pistil from the center of the flower without ripping the petals. I found it best to use your kitchen or herb scissors to cut off the pistil because by ripping it out one might ruin the flower. Whenever you buy squash blossoms, remember to use them the as soon as possible (within 1 day). 


ingredients
8-10 squash blossoms, pistil removed 
1 egg, slightly beaten
1/2 cup of breadcrumbs
1/4 cup of goat cheese, crumbled
Olive oil for frying 
Kosher salt & fresh ground pepper to taste 


preparation

In a bowl, slightly beat the egg.  Prepare breadcrumbs on a plate. Feel free to add flour, cornstarch or beer to the breading process. I prefer to use just herb-flavored breadcrumbs because the blossoms are so delicate.  Add about a teaspoon of crumbled goat cheese to each blossom and twist the top of the flower tighten and enclose.  Dip each goat cheese stuffed blossom in egg and than in the breadcrumbs.

Heat about an inch of olive oil or other oil in a frying pan over medium high heat.
Carefully place each blossom in the hot olive oil and fry until golden crisp on both sides (several minutes per side). Remove and drain on a paper towel. Season with salt and fresh ground pepper. We enjoyed dipping the stuffed blossoms in some of your favorite hot sauce. Delish! Enjoy! 

27.7.12

Grilled Artichokes


Happy, Girl Meets Grill, Friday! Our neighbor, Colin Chase, grilled artichokes for us years ago. They were smoky, tender, and DELISH! Thanks to him, grilled artichokes became my favorite grilled vegetable. I love eating layer by layer to get to the heart. This is the best way to eat an artichoke and it’s healthy too. Thank you Colin! He shared this recipe with me and you must grill these because you will get "all choked up"


ingredients

2 large artichokes
1 lemon, quartered
3/4 cup olive oil
4 cloves garlic, chopped
1 teaspoon kosher salt
1/2 teaspoon fresh ground black pepper

preparation

Fill a large bowl with cold water. Squeeze the juice from one lemon wedge into the water. Trim the tops from the artichokes, then cut in half lengthwise, and place halves into the bowl of lemon water to prevent them from turning brown.
Bring a large pot of water to a boil. Meanwhile, preheat an outdoor grill for medium-high heat.
Add artichokes to boiling water, and cook for about 15 minutes. Drain. Squeeze the remaining lemon wedges into a medium bowl. Stir in the olive oil and garlic, and season with salt and pepper.
Brush the artichokes with a coating of the garlic dip, and place them on the preheated grill. Grill the artichokes for 5 to 10 minutes, basting with dip and turning frequently, until the tips are a little charred. Serve immediately with the remaining dip. Serve immediately. Enjoy!
