A Girl & Her Food: vegetarian
                   
Showing posts with label vegetarian. Show all posts

15.5.15

grilled whole fava beans


ingredients

2 lbs of fava beans, rinsed
3 Tablespoons Extra Virgin Olive Oil
One lemon, halved
Sea Salt and Fresh ground pepper to taste


preparation

Preheat your grill to medium high heat. In a large bowl, toss the fava beans with olive oil and season to taste with salt and fresh ground pepper.  Make sure the fava beans are coated evenly.

Transfer the fava beans and lemon directly on the grates of the grill and cook, turning occasionally, about 5-6 minutes per side or until charred.  Remove from grill and put the fava beans on a serving dish. Squeeze the grilled lemon onto the fava beans.  Pop the beans out of shells directly in your mouth like you would eat edamame. Enjoy!

30.3.15

Roasted Spring Vegetables (Fennel and Carrots) Topped With Herbs and Feta


Easter and Passover are just days away and fresh spring produce is at our disposal; so it’s easy to make a beautiful and fresh meal to celebrate these holidays.  This side dish consists of garlic herb roasted carrots and fennel topped with feta cheese and fresh herbs will guarantee to be a hit at the table with your family and friends.  The best part is that the veggies can be served straight from the oven to the table but they also taste great served the next day. You can make this dish vegan by omitting feta cheese!


Serves 4-6

ingredients

A bunch of organic carrots, rinsed
One bulb fennel, sliced into medium-sized slices
4 garlic cloves
½ teaspoon of Herbs de Provence
1 tablespoon of olive oil or enough to coat all ingredients

Garnish:
Fresh herbs like sage or parsley
Goat milk feta, crumbled

preparation


Preheat the oven to 350 degrees.  In a baking dish, add the carrots, sliced fennel, garlic, Herbs de Provence and olive oil. Toss to coat evenly. I like to use my hands to make sure that all the ingredients are coasted evenly with the spice and olive oil.  Place baking dish uncovered into the oven. Roast for about one hour.  Remove and set aside to top the roasted vegetables with crumbled feta cheese and garnish with fresh herbs.  Enjoy!


16.10.14

One night only!! Jason Vincent & Lee Wolen cooking a dinner at BOKA

Jason Vincent & Lee Wolen
via Eater 


For one night only, the former Nightwood chef, Jason Vincent, will be cooking up a storm, with chef Lee Wolen of Boka, on Tuesday, October 21 at Boka. These masterminds are joining forces to highlight local and seasonal vegetable dishes from Genesis Growers. I can't contain my excitement as I adore both these chefs and their wonderfully delicious vegetarian creations. Tickets are $85. To Make reservations, call Boka 312-337-6070

1749 North Halsted Street
Chicago 


15.10.14

Zucchini Noodles aka Zoodles with Slow-Roasted Tomato Marinara


Recent weather here in Chicago has been dreary, so I grabbed the last of my fresh garden tomatoes and basil, and created this colorful and healthy lunch in hopes to fuel up "my happy tank".  Three days filled with cold and non-stop rain brings everyone down.  Argh! What happened to an Indian Summer?

My slow roasted tomatoes will make your kitchen smell like Nonna's house as they roast for several hours. If that smell can't make you feel all warm and happy inside on a dreary day,  I am not sure what will. Food is comfort. 

The zucchini noodles recipe I am sharing with you today is: 
  • paleo
  • gluten-free
  • meatless monday
  • clean eating
  • vegetarian
  • low-calorie 
  • dairy-free 
  • it's just so good for you! 
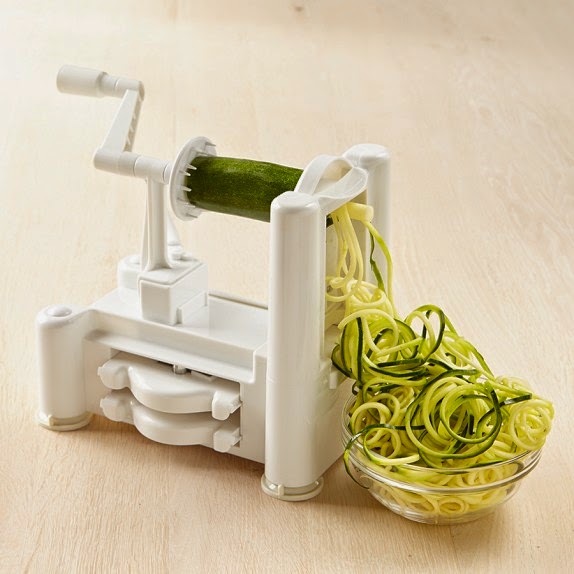
I swear by my Paderno Tri-Blade Spiral Vegetable Slicer. Available at Williams-Sonoma. It is a game-changer when preparing apples, potatoes, carrots, cucumbers, and zucchini! 

Williams-Sonoma

Zucchini Spaghetti (Zoodles) 
serves 2


ingredients

2-3  Zucchini, medium-sized

preparation 

Note: 
Zucchini is rather moist, however, so you should rinse them even if you plan to consume the noodles raw. If boiling or sautéing zucchini noodles, you should place the noodles inside a colander tossed with a teaspoon and let the noodles drip dry for 20-30 minutes. When done, rinse the noodles and wrap the noodles in paper towels and squeeze gently to absorb as much excess moisture as possible.

raw:

Slice off the ends of each zucchini, set in Paderno vegetable slicer to create noodles. Top with slow-roasted tomatoes or slow-roasted tomato marinara and fresh basil leaves. Season to taste with fresh ground pepper. 

hot:

Slice off the ends of each zucchini, set in Paderno vegetable slicer to create noodles. Once the noodles are created, place the noodles inside a colander tossed with a teaspoon of slat and let the noodles drip dry for about 20-30 minutes. When done, rinse the noodles and wrap the noodles in paper towels and squeeze gently to absorb as much excess moisture as possible. 

In this recipe, I sautéed the noodles with some olive oil and minced garlic of one clove. Heat your skillet or sauté pan over medium-high heat with about a tablespoon of olive oil.  Sauté the noodles and garlic for about 6-7 minutes, stirring frequently. Top with slow-roasted tomatoes or slow-roasted tomato marinara and fresh basil leaves. Season to taste with fresh ground pepper. Enjoy! 


9.10.14

Blistered Shishito Peppers


An amazing looking bushel of shishito peppers caught my eye this week at the farmers market.  As they are in season, and I haven't cooked with them since last year, I thought I would give them a try (you can also find them at any Asian market like Joong Boo).  Sautéed shishitos (aka blistered shishitos) are absolutely the best thing to nibble on, and they're insanely easy to prepare. I usually serve them as a snack or appetizer, but they are great additions to many dishes as well.  A newly opened restaurant, Dove's Luncheonette, serves them as a hash, with fried potatoes and an aioli, then garnished with charred scallions and queso fresco.  The recipe below, while simple, can make a hero out of any home cook.


ingredients

2 tablespoons extra-virgin olive oil 

3 cups of shishito peppers
Sea salt 

preparation 


Heat oil in a large cast iron skillet over medium high heat. Cook the shishitos by tossing and turning frequently until they blister. It should take up to 10-15 minutes to cook a panful of peppers.  Sprinkle with salt and toss the peppers. Next, slide the peppers onto a plate or bowl and serve immediately. You pick them up by the stem and eat the whole pepper, minus the stem. (Duh!) 


17.9.14

Braised Red Cabbage


Cabbage doesn't get enough respect or attention. It's a hardy, leafy vegetable filled with LOTS of vitamins. It is my comfort food and I hope this post will influence my readers to incorporate cabbage in their diet. In this recipe, I use a locally grown red cabbage from the farmers market and serve it as a hearty vegetarian salad or it pairs well with meat like chicken, beef, venison or duck.


Braised Red Cabbage 


ingredients

1 head of red cabbage
2 Tablespoons olive oil 
1/2 cup of dry red wine
3/4 cup chicken stock 
a pinch or two of ground clove
salt and freshly ground pepper
Optional: fresh parsley, chopped

preparation

Core the cabbage and chop roughly. In a dutch oven, heat the tablespoons of olive oil over medium heat, place the chopped cabbage in dutch oven and cook until softened. Make sure not to let the cabbage brown. Add the wine, chicken stock, and cloves. Bring to a boil, lower the heat and simmer, uncovered for 30 minutes. The cabbage should be tender. Season with salt and fresh ground pepper. Serve immediately. 

1.1.14

Roasted Carrots

Over the weekend, I shopped Logan Square's indoor Farmers' Market.  Iron Creek Farm had the most beautiful organic red-orange colored carrots.  Speaking of... Did you know that carrots can be grown in a variety of colors, including purple, yellow, white and even black?!  When you are preparing your farm fresh carrots, whether you are plan on cooking them or eating them raw, DON'T PEEL the skin!  Just scrub the skin clean.   With carrots, like many vegetables, the most nutritional value is just below the skin.   They can be a great source of carotene and are low in calories.  The recipe I am going to share with you calls for three simple ingredients: olive oil, salt and pepper. You don't need much to make a stellar  roasted carrot side dish.  I had my roasted carrots as a mid-day winter snack! 


ingredients 

1 bunch of Iron Creek Farm organic carrots
Olive Oil 
Kosher Salt 
Black ground pepper

preparation 
Preheat the oven to 425 degrees.  Toss the carrots with olive oil, salt, and pepper in a baking dish. Roast at 425 degrees for about 15 minutes. Enjoy! 


30.9.13

Shaved Brussels Sprouts Cesar Salad

Coupled with the fact that today is Meat Free Mondays, sharing today's recipe was easy, as Brussels Sprouts are also in season.  I hand picked these cruciferous gems at Green City Market, my local Farmers' Market, to make as the centerpiece of this shaved Brussels sprout salad.  This wonderful dish is not only easy to prepare, but its also delicious and healthy.  I prefer to eat this raw and cold, but feel free to sauté them in a bit of olive olive and garlic and toss in the remaining ingredients.  The key to this dish is shaving the Brussels sprouts as thin as possible to avoid any bitter taste. The shreds of red onion and the grated Pecorino cheese take my taste buds to veggie heaven! 


ingredients


6 medium sized Brussels sprouts, thinly sliced 
1/4 red onion, thinly sliced 
1/4 Pecorino cheese, grated 
1 1/2 Tablespoons of Trader Joe's Romano Cesar Dressing 
Fresh ground pepper 

preparation

Wash and trim the ends of the Brussels sprouts. Remove and discard any damaged leaves.  Using a mandoline or a sharp chefs knife, thinly slice the sprouts. Next, peel the red onion and thinly slice it. Place the shaved sprouts and red onion in a large bowl.  Toss in the dressing and set aside for about 
10-15 minutes.  Divide the salad onto a plate and grate the fresh Pecorino. Season with some fresh ground pepper and serve.  Enjoy! 


12.6.13

Farmer's Market Taco: { Grilled Asparagus, Brunkow Cheese, Pickled Red Onion Tacos with Ancho Chile Sauce }

Asparagus is in-season, and I purchased mine from Mick Klug Farms at Green City Market. In addition to asparagus, one of my favorite finds at that market is the Brun-uusto Baked Cheese from Brunkow's. You can throw this cheese on the grill and the magic happens. I thought what a great idea to combine the two into a farmer's market taco creation. The inspiration came from from Chef David Dworshak at Takito Kitchen in Wicker Park. They also use the Brunkow Cheese in a home made taco along with veggies.  Those are REALLY great, but I was hoping to create my version using only seasonal and local ingredients straight from the the farmer's market to my table.  It turned out great... enjoy!


I paired this dinner with a bottle of Lagoon Hill,  Sauvignon Blanc, a personalized wine delivered to my doorstep from Tasting Room by Lot 18. I recommend you try the wine tasting kit; it's only $9.99. 
It's simple and fun!  I tasted... I rated.... and Tasting Room's WinePrint technology personalized the wines that suit my palate! I am so relieved to be part of this program because now I don't have to settle or attempt to choose wines at the store, all the bottles that are delivered to me are just right! 


Ancho Chile Sauce


ingredients


2 ancho chile pods, seeded and stemmed

1 chipotle chile or 1 tablespoon sauce from 1 can chipotles en adobo
1 small yellow onion, finely sliced
2 garlic cloves, grated 
1 tablespoon olive oil 
1 tablespoon apple cider vinegar 
2 teaspoons dried oregano, preferably Mexican 
2 teaspoons of fresh lime juice from about 2 limes 
1 cup, water 
2/3 cup Mexican crema or sour cream 
Fresh ground pepper and kosher salt to season 


preparation 


Heat the ancho chiles in a sauté pan over medium high heat, turning occasionally for about 3 minutes or until toasted. Place the ancho chile in a bowl with the hot water. I use my electric water kettle to achieve the perfect water temperature. You can also heat the water in a microwave safe bowl for 1 minute.  Let it steep until the ancho chiles are softened. 


Using the same saute pan, heat 1 tablespoon of olive oil over medium high heat adding the onions; cook for about 6 minutes or until translucent, soft and lightly browned. Add the garlic and oregano, cook for about 30 seconds and the vinegar, chitople chile and cook for about one minute. Transfer this mixture into a blender along with the ancho chiles, crema (sour cream), and lime juice. Pulse  until smooth and blended. Season to preference with fresh ground pepper and kosher salt. If you can't buy ancho chile, just omit that preparation and make chipotle sauce! 

Grilled Asparagus Taco 


ingredients 


2 - 2 1/2 lbs of asparagus, bottoms trimmed 

1/2 teaspoon olive oil 
Fresh ground pepper and Kosher salt 
1 block of Brunkow's Brun-uusto Original Baked Cheese
1 package of corn tortillas
 (I used freshly delivered Atotonilctortillas)
Pickled red onions 
Fresh Cilantro leaves 
Lime wedges 

preparation 

Toss and coat the asparagus in olive oil and season with Kosher salt and fresh ground pepper.  Make sure your grill is cleaned and gently wiped down with olive oil. Heat your grill or  indoor grill pan to medium heat. Grill the asparagus for 7-10 minutes, until charred and fork tender. Turn the asparagus every few minutes so they cook and brown evenly. Remove from heat. Cut into 1-inch segments. While the asparagus is on the grill, throw your block of Brun-uusto on  the grill too and cook to your melted preference. 


To plate tacos, double stack your warmed tortillas. Spread the ancho chile sauce on tortilla, divide asparagus and cheese between the tortillas. Top with pickled red onions and cilantro. Serve immediately and garnish with lime wedges.  Enjoy! 


8.4.13

Black Bean and Goat Cheese Quesadillas

Happy Meat Free Monday! The NCAA championship is on tonight and I want to watch the games at home. I going to prepare an inherently quick and easy dinner with uses black beans and goat cheese, two ingredients I have on hand. What a perfect marriage of flavors on a crisp quesadilla!


Yields one serving

ingredients
2 flour tortillas
1/3 cup black beans, drained, rinsed and cooked
1/4 cup of goat cheese
Guacamole for serving (optional)

preparation
In a saute pan, over medium-low heat, place a tortilla in the pan.  Spread the black beans evenly over the tortilla and sprinkle on the goat cheese.
Raise the heat to medium high and cook until the cheese begins to melt and the tortilla begins to brown. Place the remaining tortilla on top of the cheese and black bean mixture and press down lightly to form  a quesadilla. Using a spatula, flip the quesadilla over in the pan and heat for about 1 minute or until cheese is melted and tortilla is browned.  Remove from heat and place the quesadilla on a plate. Cut into quarters, (shown above) and serve with guacamole or salsa. Enjoy!


2.4.13

Stephanie Izard's Roasted Cauliflower

 Stephanie Izard shared this recipe with her guests at the Macy's Culinary Council cooking demo last week.  It is actually an amazing dish featured on the menu at her vastly popular restaurant Girl and The Goat.  The recipe consists mainly of roasted cauliflower, mint, pine nuts and pickled peppers.  The pickled peppers are so good that after the demonstration I ran over to Little Goat and bought them (they come in a mason jar and cost only $5).  Later this week, I plan to get the ingredients and pickle the peppers myself. This is a delicious and filling meal that is perfect for Meat Free Monday. I would recommend it as a main if you are a vegetarian or gluten-free, or as a great side dish for you carnivores. Enjoy! 


and my retake in my kitchen.....


 Stephanie Izard's Roasted Cauliflower 

ingredients 

2 Tablespoons Canola Oil (I used Grape seed Oil) 
1 head cauliflower, quartered, outer leaves and core removed and cut into 1/4 inch slices
2 teaspoons salt
3 Tablespoons Crunch Butter (see Recipe), At room temperature
1/4 cup mint, torn into pieces, plus 1 tablespoon set aside
1/4 cup pin nuts, toasted, plus 1 tablespoon set aside 
1/2 cup Parmesan,grated plus 1 tablespoon set aside 
1/3 pickled peppers (see recipe) 

preparation 

Heat oil in a large skillet. Add cauliflower and cook over high heat until caramelized and soft, 6 minutes. 
Season with salt and cook an additional 2-3 minutes. Add crunch butter. When melted toss in the mint, pine nuts, and Parmesan. Cook an additional 2 minutes. Plate in a bowl and sprinkle with additional mint, pine nuts, and Parmesan. 
Yields 4 servings

Crunch Butter 

ingredients 

5 ounces butter, room temperature
2 garlic cloves, minced
2 Tablespoons Parmesan cheese, grated
6 Tablespoons Panko bread crumbs

preparation 

In a bowl, mash the butter until softened with a fork (or potato masher). Add the remaining ingredients and mix until fully incorporated. 

Yield 1 1/2 cups

Pickled Peppers 


ingredients 

2 cups champagne vinegar 
4 Tablespoons salt 
3/4 cup sugar
3 banana peppers, seeds removed, sliced into thin rings on a mandolin
3 Hungarian peppers, seeds removed, sliced into thin rings on a mandolin 

preparation 

In a pot, bring vinegar, salt and sugar to a boil. While still hot, pour the pickling liquid over the peppers. Let cool to room temperature, keeping the peppers submerged in the liquid. When cool, cover and refrigerate. 

Chef note: in the restaurant we use a Crumber to remove all of the seeds from the peppers to ensure that we keep them whole and not pierce the flesh. You can use a long spoon or a paring knife. Yields 1 quart. 

Recipes compliments of Stephanie Izard 
Macys.com/culinarycouncil


4.12.12

Roasted Delicata Squash with White Beans & Kale

Delicata squash is the most under-rated squash. Delicata's  exterior is pale skin and green striations and it has a mild taste, but a bit sweet.  I love all winter squashes, but with this squash you can eat it's skin. It's delicious! Delicata squash is full of Potassium, Iron, and Vitamins A & C.  I like to make this as a vegetarian meal but feel free to adapt meat or pancetta to this. 


ingredients

1 medium Delicata squash
2-3 cloves of garlic, minced
10 oz white beans, rinsed and cooked
1 bunch kale washed, trimmed, and coarsely chopped
1/8 cup of shredded Parmesan cheese
2 Tablespoons Olive Oil
Coarse salt and fresh ground pepper

Preparation

Preheat the oven to 350 degrees. Cut the delicata squash lengthwise and scoop out the seeds.
Brush the squash with olive oil and season it with salt and fresh ground pepper.
Place the squash in a baking dish and roast  in the oven for about 20-25 minutes or until fork tender. Remove from oven and let it slightly cool.

In a saute pan, heat the olive oil over medium heat. Add the minced garlic and cook it for about 1 minute. Add the kale, cooking with for about 3 minutes, and making sure to stir it frequently. Add the cooked beans to mixture and season with salt and pepper. Set aside until the delicata squash is roasted or begin filling the middle of the squash with the white bean-kale mixture. Sprinkle the top with the shredded Parmesan cheese and place in oven for about 5 minutes or until cheese is melted.
Serve!


14.11.12

Roasted Brussels Sprouts & Red Onions with Balsamic Vinegar

Thanksgiving is around the corner and I wanted to share some skinny in-season side dishes. I swoon over brussels sprouts and they supply you with vitamin C.  This side dish can be prepared a day prior by trimming and quartering the brussels sprouts and slicing the onions up. It's guilt free because it's a low-cal & low-fat side dish! 


serves 8

ingredients


1 1/1 lb brussels sprouts, trimmed and quartered

1 1/2 lb red onions, thickly sliced
1/4 cup balsamic vinegar
1 tablespoon olive olive 
kosher salt
fresh ground pepper 

preparation


preheat oven to 450 degrees. Line a large baking sheet with parchment paper or nonstick foil. 
Spread the brussels sprouts in single layer on prepared baking dish and toss with olive oil. Roast the brussels sprouts, stirring occasionally, for about 12 minutes. 
Add the onions, tossing to combine and roast for about 10 minutes or until golden brown. Drizzle the balsamic vinegar, tossing to combine and roast for about 2-3 minutes longer. 
Transfer to serving bowl and season to taste with salt and fresh ground pepper. 

Enjoy! 


Pochettes of Feta, Tomato & Basil


"Cook with your heart, because cooking is celebration and food is love" 
          - Padma Lakshimi


I know this recipe seems a bit labor-intensive, but it is well worth it when you want to impress your dinner guests with something spectacular. It is a definite crowd pleaser. The thing to remember is not to let working with the filo pastry intimidate you. Just stay calm and give your self lots of time for the project. I assemble the pochettes a couple of hours ahead and pop them in the oven just 10 minutes before guests arrive, keeping them warm in the turned-off oven if necessary.


ingredients

1 1-pound package filo dough (about 30 sheets measuring 17 inches by 12 inches)
5 plum tomatos
10 ounces Greek feta cheese, crumbled
2 cups loosely packed, finely chopped fresh basil
1/2 teaspoon crushed dried red pepper
Salt (optional)
1 cup (2 sticks) butter, clarified ( I used ghee)


preparation

Remove the filo from the refrigerator 30 minutes before starting. 
Slice the tomatoes lengthwise and scoop out the seeds with a spoon. Squeeze gently to eliminate excess liquid. It’s important to get the tomatoes as dry as possible. Wipe dry, inside and out, with a paper towel. When the tomatoes are dry, dice them.
 In a bowl, combine the tomatoes, feta, basil, and crushed red pepper to form a salad. Add a pinch of salt only if needed.
Prepare the filo dough by laying out a clean dishcloth on a flat surface. Make sure both surface and cloth are large enough to accommodate the flat filo. Stack the filo on the cloth, and cover with another dishcloth. With hot water, dampen and wring out a third cloth and lay that flat over the top cloth.
Preheat the oven to 375°F.
Cut the filo stack carefully—with kitchen scissors, as knives tend to tear the pastry—into 8-inch squares. Remove 3 squares of the filo at a time, keeping the rest under the towels.
Take 1 sheet and brush it with the clarified butter. Place a second sheet of the filo at a 45° angle over the first, and brush this with butter as well. Place the third sheet of filo at a 45° angle over the second, and brush this with the clarified butter.
Now spoon 1 to 2 tablespoons of the tomato salad onto the center of the filo. Gather together the corners of the filo and twist the packet ends gently, as you would the ends of a hard-candy wrapper. Fan out the ends into a rose floret. Then peel down the petals to fan out a nice crown. Brush the top of the pochette with more clarified butter. Repeat this process until you have about 10.
Place the pochettes on a baking sheet in the preheated oven for 10 to 12 minutes, until the sides are golden brown. Serve warm.

© 2007 Padma Lakshmi Tangy, Tart Hot & Sweet 

30.10.12

Spicy roasted pumpkin seeds

I love Pumpkinpalooza! After carving your pumpkins for Halloween or cooking with pumpkin, don't throw out the seeds. I promise you, they are the best and a very healthy snack built into your pumpkin. Toast the seeds in the oven for a perfect fall treat! There are so many ways to flavor the seeds, my favorite is make 'em spicy! If you have a sweet tooth, use cinnamon and sugar as your seasoning. Yum-O! 


ingredients

1 1/2 cup of pumpkin seeds 
(rinsed and cleaned from pumpkin membranes/pulp)
2 tablespoons olive oil 
1/2 teaspoon paprika
1/4 teaspoon cayenne pepper


preparation 

Preheat the oven to 350 degrees. Clean and rinse the seeds from pumpkin membrane and pulp. I am obsessed with my Dexas collapsible strainer, it saves so much room in the cabinet and drawer. It is super easy to clean and dishwasher safe.  


In a bowl, toss the seeds with olive oil and seasoning. Make sure to coat thoroughly and evenly. Spread the seeds on one even layer on a baking sheet. You can use a spit mat, parchment paper, or aluminum foil on a cookie sheet. Bake for about 30 minutes or until seeds are toasted golden. Enjoy! 


12.10.12

pan roasted asparagus poached egg & miso butter

I love miso butter.  It's so good, I lick it from the spoon like it's cake frosting.  Call me crazy or a complete fatty, but it's the bomb.  The butter is so amazing I want to dish it with everything!  Have you tried my Miso Glazed Cod
My last post stated, I prepared a Momofuku themed anniversary dinner, it's one of my favorite spots in NYC.  David Chang's cookbook is outrageous and confrontational,  is not for everyone but I love his approach and every dish it. I don't mind the labor intensive dishes and the obscure ingredients, it becomes a scavenger hunt and educational trip for me at Joong Boog Market.     
If you aren't willing to step out of your comfort and experience his blunt attitude along with some 
f-bombs, sorry you can't hang Momofuku style. I enjoy his voice in the cookbook, I feel he is coaching me, a home cook, through his techniques.  I will always make poached eggs the Momofuku way, slow poached! 
Back to the pan roasted asparagus, it's a great side dish or can fill any vegetarian's belly! 
Try this recipe over the weekend, can't wait to hear your feedback! 


a recipe from Momofuku cookbook 

ingredients

1/2 cup shiro (white) miso 
8 tablespoons (1 stick) unsalted butter, at room temperature 
1/2 pound of thin to medium asparagus 
kosher salt
2 tablespoons Sherry vinegar
4 slow poached eggs
Freshly ground pepper

preparation 

Miso Butter

combine the miso with 5 tablespoons of butter in a small bowl and beat with a wooden spoon until well mixed. Make sure the butter is one color and not a streaky mess. Reserve until needed; you can refrigerate it, well wrapped, for up to a few weeks!! 

Snap off the woodier bottom inch of each asparagus stalk.  use a vegetable peeler to shave away the tougher outer layer from each stalk, but don't get carried away: you probably won't need to peel the stalks more than 2 or so inches up from the trimmed end. 

Heat the remaining 3 tablespoons of butter in a wide skillet to over medium high heat. Line a plate with paper towels for draining the asparagus. when the butters sends up the first wisp of smoke, put the asparagus in the pan.  (Do not overcrowd pan; cook in batches if necessary, draining each one, and refreshing the butter if the butter from the first batch smells scorched.)
When the asparagus start to take on some color, 2-3 minutes, season them with a generous pinch of salt and turn the heat down to medium. Turn them with a spoon or spatula so they can color on the second side, another few minutes. When the asparagus are nicely browned and tender (but not exactly soft), transfer them to a the paper towels to drain. 

While the asparagus is cooking, heat the sherry vinegar in a small saucepan over medium heat. After half a minute, add the miso butter, turn the heat to low, and stir to warm it through.  When the butter has loosened slightly-it should still have a certain viscosity to it and shouldn't be melted-remove from the pan from the burner and put it in a warm spot

Season the cooked asparagus with another pinch of salt if needed. Smear a quarter if the warmed miso butter into a thickish puddle in the middle of each plate. Divide the asparagus among the plated and top each with an egg. Finish each dish with a few turn of black pepper and serve at once. 

Slow Poached Eggs

ingredients

large eggs

preparation 

Fill your biggest, deepest pot with water and put in on the stove over the lowest possible heat. 

use something to keep the eggs from sitting on the bottom of the pot, where the temperature will be highest.  If you've got a cake rack or a steamer rack, use it.  If not, improvise: ad doughnut of aluminum foil or a few chopsticks scattered helter skelter across the bottom of pan will usually do the trick, but you know what you've got lying around. Be resourceful. 

use an instant read thermometer to monitor the temperature in the pot- if it's too hot, add cold water or an ice cube. Once the water is between 140 degrees and 145 degrees, add the eggs to the pot. Let them bathe for 40 to 45 minutes, checking the temperature regularly with the thermometer.

You can use the eggs immediately or store them in the refrigerator for up to 24 hours. ( If you are planning to store them, chill them until cold in an ice-water bath) If you refrigerate the eggs, warm them under piping hot tap water for 1 minute before using

To serve the eggs, crack them one at a time into a smaller saucer. The thin white will not and should not be firm or solid, tip the dish to pour off and discard the loosest part of white, then slide the egg onto the dish it's destined for