A Girl & Her Food: whole foods
                   
Showing posts with label whole foods. Show all posts

25.10.15

Grilled Spicy Maple Sriracha Lime Chicken Wings


One of my first food loves I can remember is the great American classic 
“buffalo wing”.  Generally prepared fried, with crispy delicious, skin, and all, then immediately tossed and served in some spectacular buffalo sauce and served with some celery and ranch or blue cheese, depending on my mood.  Some of my favorites of all time include Buffalo Joes in Evanston, Wings and Curls in Ocala, Florida, and the original Vine in Iowa City.

But the truth is, you can make great chicken wings on the grill at home.  Its healthy, a fraction of the mess, no clean up, and doesn’t require a fryer, which most people don’t generally have or aren’t comfortable using.  The preparation for the chicken wing is exactly the same every time, and then you can change up the sauce you are tossing it in, to create completely different and unique tasting wings.  I urge you to explore outside of just “buffalo style”.

You are going to need some chicken wings.  You can find them at pretty much all grocery stores, but, as always, if you can afford it I recommend buying some high quality wings from your local butcher.  Marianos, Whole Foods, and other mass merchant grocers also offer an organic high quality wing too, if you ask for it.  The difference in quality as compared to a cheap chicken farm wing is tremendous.  Not only will the meat be so much more ample and succulent, but it will be void of all the tendons and grossness you will find from cheap poultry farm chicken.  I like to buy the 3 piece wing, with wing tip still in tact.  It makes them easier to grill and handle, and I enjoy tearing the pieces apart as I’m eating.   I think each part has different delicacies to enjoy.  But this is complete personal preference, and you can ask the butcher to cut the wings at the joints when you buy them, or just to remove the wing tips, or whatever you want. 


However you get them, you are going to want to rinse them down with water, pat them completely dry, and then generously toss in coarse salt, pepper, and olive oil.  That’s it!  Make sure the wings have had a chance to come down to room temperature (or close to it) before throwing them on the grill.  The key is to make sure the grill is super hot (450+ degrees).  The hotter the better.  Put the wings on the grill, and close the lid.  Keep closed and hot.  You can check on them every few minutes to make sure you aren’t flaming up too bad anywhere.  You are going to want to leave them without turning for around 10 minutes.  After 10 minutes, turn them over and cook for another 10 minutes with lid closed.  Again, check on them every few to make sure you don’t have too much fire.  If you know certain parts of your grill are hotter than others, you may want to rotate the wings around a little bit.  After about 20 minutes of grilling, check to see how they look.  The skin should be good and charred and crispy.  Its almost impossible to overcook wings.  Cooking time will vary 20 -30 minutes depending on heat.  Once they look delicious, you can pull them off, and eat them “as is” or…. Toss them in your favorite sauce and Enjoy!  You will be thanking me….

Spicy maple sriracha chicken wings are the perfect balance of sweet and spicy! Prepare on the grill for a delicious twist on the traditional Summer favorites or bake on game day for the perfect game watching snack.


Spicy Maple Sriracha Chicken Wings 
recipe from Pure Canadian Maple Syrup


ingredients
2 lbs chicken wings, halved ( I used wings from Whole Foods
1 teaspoon salt
1/2 teaspoon ground coriander
1/4 teaspoon ground cinnamon
1/4 teaspoon ground cumin
1 tablespoon olive oil 
3 tablespoons of  Pure Canadian Maple Syrup 
2 tablespoons of Huy Fong Foods Sriracha Sauce
2 tablespoons butter, melted
2 tablespoons of Sir Kensington's Ketchup
1 tablespoon lime juice
1/2 teaspoon grated lime zest

To Bake:

In a larger bowl combine wings, salt, coriander, cinnamon, cumin and olive oil. Stir until well blended. Chill 1-4 hours. Heat oven to 400 degrees. In a bowl combine maple syrup, sriracha sauce, butter, ketchup, lime juice and zest; set aside. Bake 30 minutes until cooked through and crispy. Remove from the pan and toss in maple mixture. Return to baking sheet. Spoon any extra sauce onto the wings. Bake 20 minutes, until crispy and sauce is set. 

To Grill: 

However you get them, you are going to want to rinse them down with water, pat them completely dry, and then generously toss in coarse salt, coriander, cinnamon,cumin and olive oil.  In another bowl combine maple syrup, sriracha sauce, butter, ketchup, lime juice and zest; set aside. Make sure the wings have had a chance to come down to room temperature (or close to it) before throwing them on the grill.  The key is to make sure the grill is super hot (450+ degrees).  The hotter the better.  Put the wings on the grill, and close the lid.  Keep closed and hot.  You can check on them every few minutes to make sure you aren’t flaming up too bad anywhere.  You are going to want to leave them without turning for around 10 minutes.  After 10 minutes, turn them over and cook for another 10 minutes with lid closed.  Again, check on them every few to make sure you don’t have too much fire.  If you know certain parts of your grill are hotter than others, you may want to rotate the wings around a little bit.  After about 20 minutes of grilling, check to see how they look.  The skin should be good and charred and crispy.  Its almost impossible to overcook wings.  Cooking time will vary 20 -30 minutes depending on heat.  Toss them in your maple syrup sauce and Enjoy!  You will be thanking me….


23.1.15

DIY Immune Boosting Tonic


Terry Walter's book Eat Clean Live Well introduced me to a DIY immune boosting tonic. This recipe was passed on to Terry by a wise woman, the founder of The Institute of Sustainable Nutrition, it is a vinegar based tonic which helps with everything, literally! The concoction destroys both gram-positive and gram-negative bacteria. It is also a potent anti-viral and anti-fungal or yeast, and will increase blood and lymph circulation to every part of the body. 
It is so effective that it is said to be the cure for colds and the flu, and infections!  

Immune Boosting Tonic

Take one tablespoon of immune boosting tonic each day during the flu season. I suggest mixing it with juice or tea as it is quite strong.  You can also incorporate the tonic by adding it to salad dressings, marinades, soups…..


recipe from Eat Clean Live Well

ingredients

1/2 cup fresh ginger root, peeled and grated
1/2 cup fresh horseradish root, peeled and grated
1 cup onion, chopped
10 garlic cloves, crushed
3 tablespoons fresh turmeric root, peeled and grated
1 fresh cayenne pepper, minced 
1 lemon, zest and juiced
3 sprigs of fresh rosemary
3 slices of dried astragalus root 
Bragg's Apple Cider Vinegar
Local raw honey 

preparation

Tips: 

Use gloves to peel and grate the turmeric as it stains (badly!)  Terry recommends wearing the gloves when mincing the hot peppers.

When grating the horseradish, make sure to be in a well ventilated room as the fumes from it are strong and overwhelming! 

There was no fresh cayenne peppers at Whole Foods, so I substituted with a serrano pepper. 

You will not find dried astragalus root at Whole Foods, only in liquid and capsule form, so you have to head to a Chinese herbal store like Vinh Hoa  in Uptown or order it on Amazon

preparation

Place ginger, horseradish, onion, garlic, turmeric, cayenne, lemon zest and lemon juice in a non-reactive bowl. I recommend using a large glass bowl. Use your hands to mix ingredients together and pack firmly into a 1 quart mason jar. 
Wedge the rosemary and astragalus root down along the sides of the jar and below the top layer of ingredients. Pour enough of apple cider vinegar to cover the ingredients. Place a sheet of parchment paper over the top of the jar and screw on the lid. Shake the jar and set it aside in a cool dry place out of direct sunlight. Let cider sit of 1 month, but make sure to shake it daily. 

After one month,  drape a piece of cheesecloth over a large bowl and empty the contents of the jar into it. Pull up sides of the cloth, twist the top to close and squeeze as much juice as possible into the bowl. Discard the solids and fast cider. Add honey, a little at a time , to achieve desired taster and return to jar. 


22.9.14

Meatless Monday {Clean Eating} Roasted Beet Carpaccio


As a Polish girl, I was born with a beet in my hand.  We go together like peanut butter and jelly.  Every week, I am sure to buy them at the farmers' market and incorporate them into my (Polish) diet.   Eating whole and clean is very important to me, and it is not as difficult as people make it out to be.  The following recipe is from the book Clean Eats, by Dr. Alejandro Junger, the person I consider to be my clean eating guru.

A few months back, my husband and I hosted a small dinner party.  I was looking to make something, like a gorgeous starter or passed appetizer that would impress my guests.  When I saw the roasted beet carpaccio pictured in his book, I instantly knew this dish would be the one to get everyone at the party talking.  It did not disappoint.  The presentation was colorful and elegant, and most importantly it was delicious.  As most people usually eat a meat or fish carpaccio, a vegetarian option makes for an attractive option.


adapted from Clean Eats  


ingredients

4 large beets, peeled (use rubber gloves when peeling beets!)
2 handfuls of frisée, spinach or arugula
1 small handful of fresh herbs, such as mint, dill, parsley, ideally some edible flowers
Juice of one lemon
1/4 cup extra virgin olive oil, plus more for beets
Sea Salt and freshly ground black pepper to taste 

preparation

Preheat the oven to 350 degrees. Place beets in a baking dish, pour about 1/2 inch of water and then cover the dish with tinfoil. Roast the beets for about 45 minutes or until the beets are fork tender. remove them from the oven, drain the water, and allow the beets to cool. 
Once the beets have cooled, use a mandoline to slice them unto very thin rounds. Be careful as I sliced my finger on my mandoline, if you don't have one use a sharp knife to slice the rounds. 
Arrange the thinly sliced beets  over two serving plates, covering the entire surface of each plate. Drizzle the beets with olive oil and sprinkle them with the  sea salt. In a medium mixing bowl, toss the greens and herbs with the lemon juice, olive oil and salt and fresh ground black pepper.  grab a small bundle of greens with your hand and place it in the center of each plate, on top of the beets. Serve immediately and enjoy! 


4.10.13

Grilled Lobster Tails


It's Fish Friday! Who doesn't love a grilled lobster tail? They are a delightful treat and you don't need to spend a fortune, or go to a steak and seafood house. It's an easy, "fancy" meal to make at home for a date night or celebration!  I bought my lobster tails at Whole Foods for $11.99 per tail.  Keep an eye on them because I often see them at 2 for $12 - What a steal!  The flesh of the lobster tails can get dry so make sure to use lots of butter or herb oil for basting. 


ingredients

2 lobsters tails (about 6-8 ounces) 
4 tablespoons of butter (melted) or 3 tablespoons of olive oil
1 Tablespoon of fresh parsley, finely chopped (chive is great, too! ) 
Kosher Salt and fresh ground pepper 


preparation

Preheat your grill to high. 

Prep the lobsters by butterflying the lobster tails before grilling. I use my kitchens shears to make a lengthwise cut through the hard shell.  I like to call this cutting down from the spine to the tail.  Next, using a knife, cut the tail meat in half slicing through the meat.
Place the lobster 'shell side up', and sear the meat. After 3 minutes, turn it upside down and begin to baste them with herb butter or oil. Grill until done for 5-8 minutes depending on the size of the tail. Serve with some grilled turf or just eat alone with some drawn herb butter/oil. Enjoy! 


28.2.13

Coconut, Chille & Lime Scallop Tostadas

When I was in college, I had the opportunity to live in Cuernavaca, Mexico.  During my time there, I fell in love with Mexican cuisine, and to this day it has greatly influenced me as a home cook.  Seemingly always I try to incorporate the freshness, flavor, and authenticity of these wonderful regional ingredients into any meals that I cook.


Tostada

According to Rick Bayless, "What a lot of people don't know about Chicago  is that we have the  greatest concentration of artisanal tortilla factories in the world."  He said it and its the truth.  I have a little Mexican grocer where I find a pack of  warm corn tortillas from Atotonilco Tortilleria wrapped in paper, indicating they were made recently and without preservatives- just lime, corn & water. I decided to incorporate this authentic Mexican staple into my appetizer by making a tostada.


Grab 2-3 tortillas from the stack.  Using a 2-inch cookie cutter or a small glass and a pairing knife, trace and cut out a small circle.  In a frying pan, heat oil until a drop of water sizzles immediately when added to it.  Once hot enough, add tortillas in a single layer and fry lightly on each side, about 1-2 minutes, or until golden crisp. Remove and drain on a paper towel.  Set aside.  Repeat.


Scallops with Coconut, Chile and Lime

ingredients

1 pound wild caught sea scallops
1 can 365 Everyday Value Coconut Milk
1/2 cup yellow onion, diced
1/4 habanero chile, seeded and minced
1 tablespoon of 365 Everyday Value Organic Coconut oil
1 tablespoon butter
1 tablespoon of olive oil
1 small clove of garlic, minced
Juice and zest of one lime
Sea Salt
Fresh ground pepper
To garnish: 2-3 Tablespoons fresh cilantro, roughly chopped

preparation

Heat coconut oil over medium-low heat in a large skillet.  Add onion, garlic, and habanero chile and sauté for about 5 minutes or until onion is translucent.  Add the coconut milk and raise the heat to medium high and bring to a simmer.  Cook, stirring occasionally for about 5 minutes, so the flavors can blend together.  While the coconut milk mixture is simmering, we will turn our attention to the scallops.

Heat approximately 1-2 tablespoons of olive oil in a frying pan.  Once hot, place the scallops in the oil and sear, turning once, golden on both sides, about 1-2 minutes per side. Transfer the scallops to a plate. Add a little sea salt while they are searing.

Next, add the butter, lime juice, and zest to your coconut milk, and add the scallops to this mixture. Cook until scallops are opaque throughout, about 5-7 minutes. Season with a bit more sea salt and fresh ground pepper.


Ladle the scallop onto the tostadas you set aside.  Take another tablespoon and drape some coconut,                
lime,  and chile sauce on top of tostada and garnish with chopped cilantro. Serve immediately!
¡Buen Provencho!


20.7.12

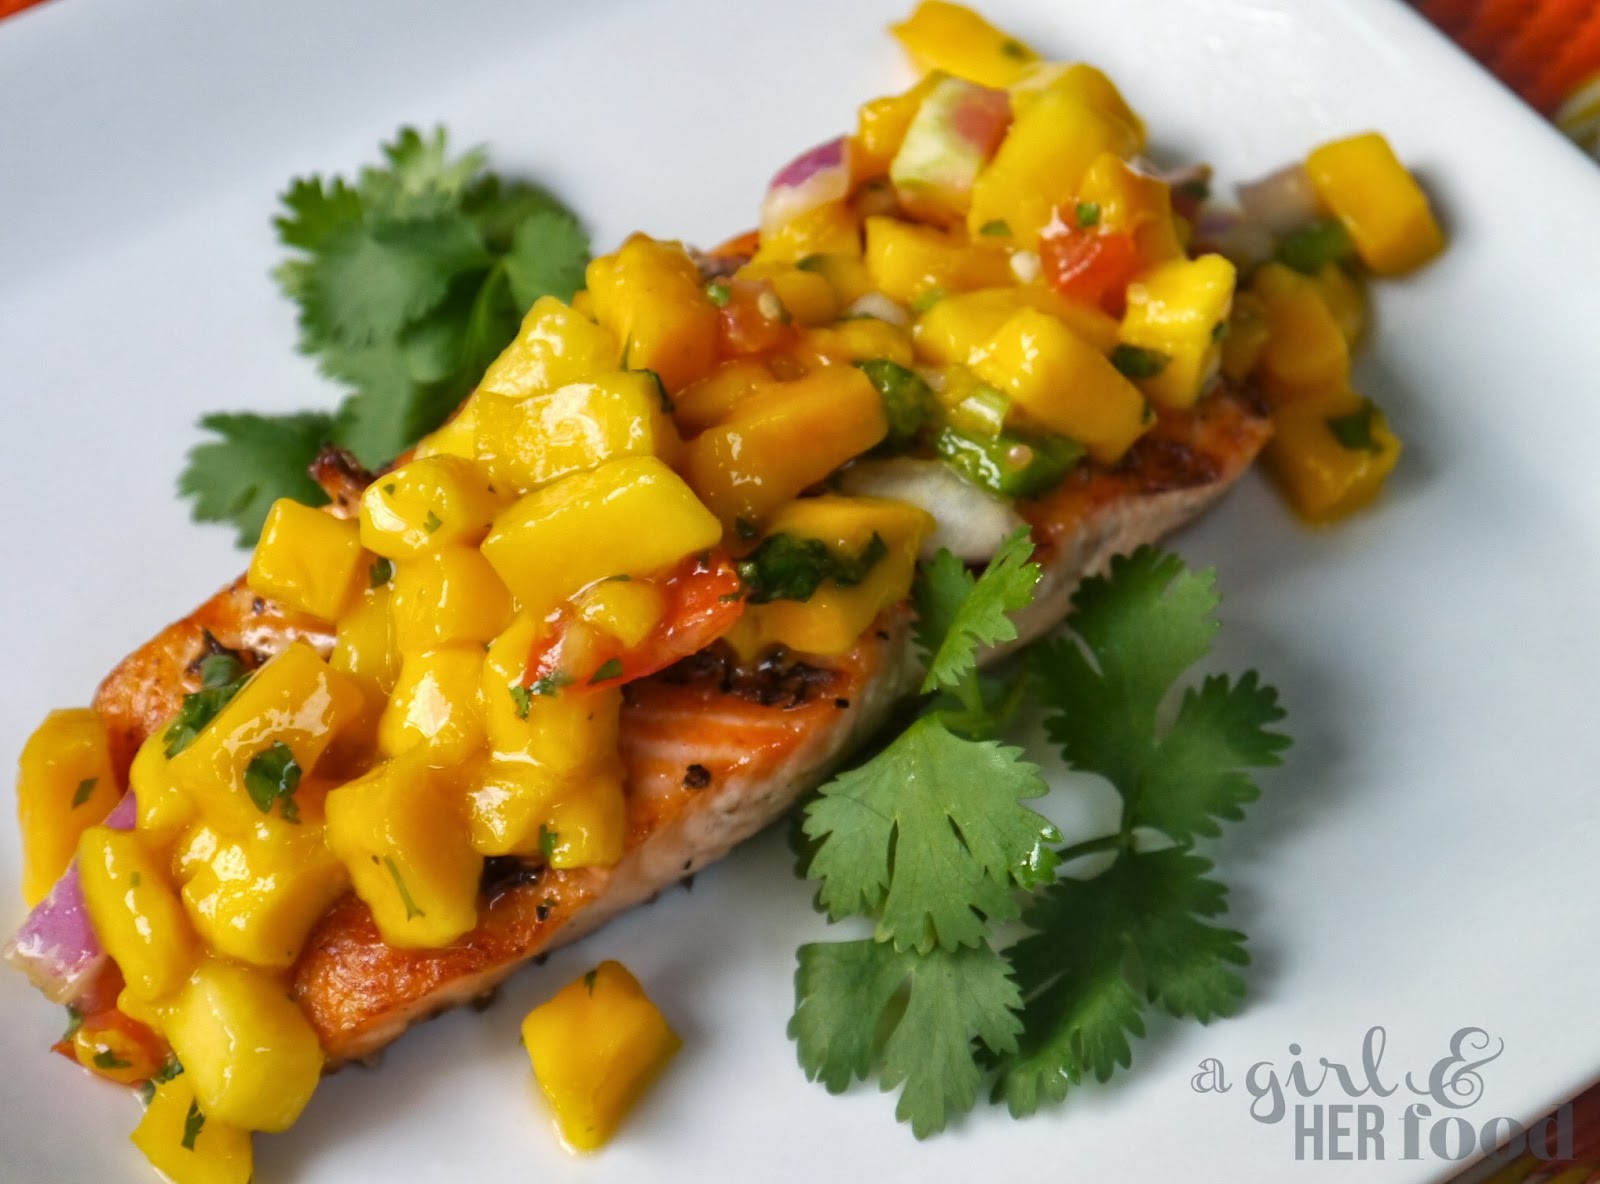
Grilled Salmon with Mango Salsa


Happy, Girl Meets Grill, Friday!! Salmon is my favorite fish to eat. I cook and grill with simple ingredients because I hate to overpower my food with too many marinades and seasonings. With a piece of delicious grilled salmon, you can come up with so many wonderful fresh toppings. One of my favorite summertime grill toppings is mango salsa. It's exotic and zesty. If you are short on time, you can always pick it up at most local grocers, like Whole Foods


ingredients

2 -6oz pieces of salmon fillets, skin on 
(I used the Icelandic salmon from Whole Foods- it grills the best!) 
kosher salt
fresh ground pepper

Mango Salsa
1 mango, peeled and diced
1/3 cup red onion, diced
1/3 cup fresh cilantro, roughly chopped
1 tablespoon/teaspoon jalapeño, finely chopped 
(add according to your spice preference) 
1 tablespoon lime juice
salt and fresh ground pepper 

preparation

Preheat the grill to medium-high heat. It's very important to have your grill clean without any past grilling residue. We wipe down the grill with a soft cloth dabbed in olive oil. 

Season the salmon with kosher salt and fresh ground pepper. 
  
Place the fillets on the grill, skinless side down first. Close the grill lid, and cook 2-4 minutes on the first side. Once the fish fillets have been placed on the grill, do not move them until you are going to flip them over, otherwise they may fall apart. Make sure to use tongs, and/or a metal spatula, to carefully turn the fish onto the other side, so it's skin side down on grill. Close the grill lid, cook for another 2-5 minutes, depending on the thickness of the fillets. Salmon is done when it's just barely opaque throughout.

Meanwhile, in a bowl, combine first five ingredients for the mango salsa and mix well.  Season with salt and fresh ground pepper, to taste.

Plate the salmon and top with mango salsa. Serve immediately. Enjoy!!